Splitboard Skins
If you’re buying a splitboard on SENDY and it doesn't come with precut skins, fear not, it’s easy to cut and fit your own skins. We'll walk you through the process, and give you a quick overview of some brands making solid climbing skins.
How to Fit Skins
Trimming climbing skins properly ensures they fit your skis or splitboard perfectly, providing optimal grip and glide.
What You'll Need
Climbing skins: make sure they are the right length for your skis or splitboard.
Skin trimming tool: usually provided with new skins.
Marker: optional, for marking the cut line.
Sharp scissors or utility knife: to make precise cuts.
Protective gloves: to avoid skin contact with the adhesive.
A Step-by-Step Guide
Prepare your work area: find a clean, flat, and well-lit workspace. Lay out all your tools and materials.
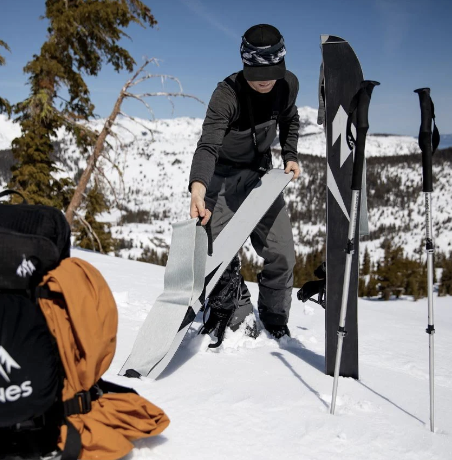
Attach the Skins to Your Skis: hook the tip loop over the front of the ski. Center the skin along the length of the ski, ensuring it’s straight. The adhesive side should stick to the base. Pull the skin tight and attach the tail clip to the end of the ski. If your skins don’t have a tail clip, make sure they extend slightly beyond the ski tail for proper tension.
Initial Trimming: most skins are intentionally wider than your skis to allow for a custom fit. Use the trimming tool or a marker to outline the edge of the ski, leaving approximately 2-4 mm of the ski edge exposed on each side. This ensures you’ll have enough edge for grip on hard snow.
Make the First Cut: starting at the tip, use the trimming tool to cut along the side of the ski, maintaining the 2-4 mm gap from the edge. Trim one side first, then repeat for the other side. If the trimming tool isn’t sharp enough, use sharp scissors or a utility knife for precision.
Fine-Tune the Fit: after trimming both sides, reattach the skins to the skis. Check for even coverage and ensure the ski edges are exposed equally on both sides. Make any necessary adjustments or additional trims for a perfect fit.
Secure the Tail Clip: if your skins have a tail clip, ensure it’s securely attached. For skins without tail clips, ensure the adhesive sticks firmly, with no air bubbles or gaps.
Tips for Trimming
Take your time to ensure precision. Make sure your work area is well-lit to see the edges clearly. Wear gloves to protect your hands from both the adhesive and the trimming tool.
Maintenance
Store Properly: Keep your skins dry and free from dirt and debris.
Dry After Use: After each use, dry the skins to maintain adhesive quality.
Some popular and highly rated splitboard skins include:
Black Diamond Ascension: these skins are made from a high-quality, hydrophobic material that provides good traction and glide. They're also designed for easy trimming and attachment. BD will do you solid on these and might offer the best value out there, just make sure you use skin savers and take care of the adhesive.
Voile: a respected brand in the splitboarding community, their skins are known for good traction, durability, and easy attachment. The Toyota truck of skins. Voile has been in the game a long time and stands behind their products. Some of the very first splitboards were Voile!
Spark R&D Blaze: skins are made from a hydrophobic material that provides pretty good traction and glide. Spark has some amazing equipment in the splitboard world, but for us personally we found the Spark to be a little more slick on the steep uphill tracks than some of the other brands.
K2: skins are made from a hydrophobic material that provides good traction and glide comparable to other brands, and are designed for easy attachment and adjustment and often feature a custom attachment to certain boards that works well.
The 'best' splitboard skins will vary based on personal preference and the type of splitboarding you plan to do.